PLEASE NOTE: The information posted at this wiki about this or any quest are done so by players. They might or might not be 100% correct and should be looked upon as a guide, not an absolute.
03/15/2022 ALL OF THE QUEST DETAILS INCLUDING STEPS, OUTCOMES AND SPOILER ARE CURRENTLY BEING RE-WRITTEN. THE INFORMATION MAY NOT MATCH FOR THE NEXT 1 OR 2 DAYS SO PLEASE HOLD OFF ON STARTING THIS QUEST. Zorlanda EU1
Overview
| The Unfolding Tale | |
|---|---|
| Details | |
| Level | 87 |
| Type | Side quest |
| Location | Gortrin Passage |
The Unfolding Tale is a Quest in Villagers & Heroes.
This is a unique hidden optional quest with no npc providing a start to the quest. There are many different outcomes to the quest depending on the steps you take and the outcome triggered determines the reward you receive. The rewards vary from nothing for the worse or no outcome to 7.2 million xp, 5 sockets and an epic weapon for the best outcome.
If you fail to achieve the Outcome you want then you can reset the quest and repeat it by using a Gortrin Hourglass while stood on the teleport pad in Gortrin. However, the reward for each outcome is only given once. If you achieve the same outcome a second time you will receive no reward. You can repeat the reset process using the Hourglass as many times as you wish. The Gortrin Hourglass is a very rare drop from mobs in Gortrin Passage.
Warning: The Walkthrough section is a giant spoiler. Consider trying to solve the mystery and complete the quest on your own at least once before reading it! It will require much running around the zone to find clues from either items or the NPCs.
[Note: some of the rewards still need to be checked as there appear to be inconsistencies between the table of rewards and the detailed outcome list]
Prerequisite
See Walkthrough section for details on how to start this quest.
NPCs
Extra Info
Raza - She is the most powerful and will kill Gerald/Fen and Tiko if she is given their location. She also prevents these 2 from leaving the Passage.
Gerald/Fen - He cannot kill Raza alone but is a dark magic user and will turn Tiko into a zombie if he is given his location. He is trapped in the passage by Raza and can only escape if Raza is dead.
Tiko - He is the least powerful and is also trapped in the Passage by Raza. He needs to escape alive but to achieve this you need to kill Raza.
Half of Raza's Phylactery - This is the source of Raza's power but is also her achilles' heel.
At every stage, pay attention to what you say to the NPCs! If you don't like the option given, choose to leave and return when you have more clues. (In general, it will be safe to tell one NPC about the existence of another, but for the better endings, do not tell them about where they are.)
Outcome Summary
There are many different possibilities and not all have been tested and verified.
The following outcomes create an entry in your quest journal and are therefore considered successful for the outcome achieved.
| XP Reward + other | Raza | Gerald/Fen | Tiko | Steps |
|---|---|---|---|---|
| 720,000 | Alive` | Dead | Dead | Outcome 1
checked 01/31/2022 Zorlanda EU1 |
| 1,080,000 | Disappeared | Alive | Zombie | Outcome 2
checked 13/01/19 |
| 1,800,000 +
Uncommon Weapon |
Disappeared | Dead | Alive but trapped | Outcome 4
verified 02/03/2022 Zorlanda EU1 |
| 1,080,000 | Dead | Dead | Dead | Outcome 5
verified 01/31/2022 Zorlanda EU1 |
| 2.088.000, Rare weapon, Socket | Dead | Alive and Escaped | Alive and can leave | Outcome 6
checked 01/31/2022 Zorlanda EU1 |
| 1,080,000 | Dead | Alive and Escaped | Dead | Outcome 7 |
| 7.200.000, Epic weapon, 5 Sockets | Dead | Dead | Alive and can leave | Outcome 8
checked 01/31/2022 Zorlanda EU1 |
The following outcomes do not create an entry in your quest journal and result in the quest ending when all of the collected journal pages are removed from your inventory.
| XP Reward + other | Raza | Gerald/Fen | Tiko | Steps |
|---|---|---|---|---|
| Nothing | Dead | Dead | Zombie | Outcome 3
verified 03/12/2022 Zorlanda Eu1 |
| Incomplete Outcome 13 | Alive | Alive | Dead | Outcome 9 |
| Not tested | Disappeared | Dead | Zombie | Outcome 10 |
| No reward | Dead | Alive and escaped | Zombie | Outcome 11 |
| Not tested | Alive | Dead | Zombie | Outcome 12 |
| Quest gets stuck after phylactery taken
Bug report raised |
Disappeared | Dead | Dead | Outcome 13 |
| No reward | Alive | Dead | Alive | Outcome 14 |
| Not tested | Alive | Alive | Zombie | Outcome 15 |
The rewards for some of the outcomes appear mismatched to the outcome itself. For example, Outcome 2 is clearly worse than Outcome 3, despite Tiko ending up a zombie in both yet Outcome 2 provides a journal entry and reward but Outcome 3 does not.
Objectives
- The objective will vary depending on the outcome you wish to achieve. See the walkthrough for details.
Rewards
- The reward varies depending on the outcome achieved.
Walkthrough
From this point there is a lot of information to enable the player to work out how to achieve the outcome they wish. After that there is a spoiler which shows the steps to achieve each outcome.
The following steps are required for every outcome and must be done in order:
- Pick up the Handwritten Note at G4 and read it (on the ground in front of the portal to Zorian Marshland). You only need to do this the first time you do the quest and may have already done this as part of the main quest line. This will allow you to pick up items from the lootable containers on the map that progress the story.
- Kill zombies until they drop (you need 1 of each)
These items may drop but are not required:
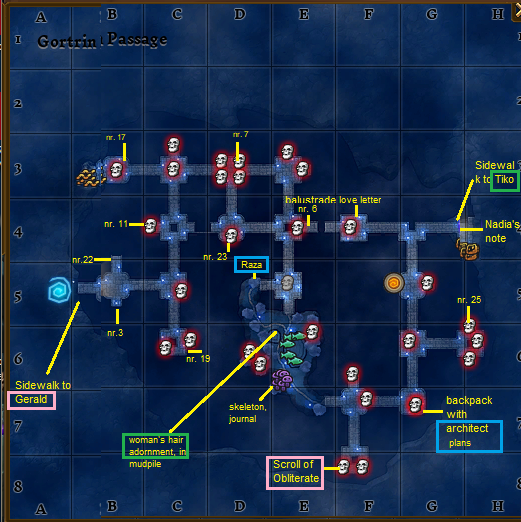
3. Pick up page of Architect's Plans (G7, at the bounties Wartot & Ardima, in an 'Old Pack' near the railing on the east side)
4. Tillothy's Journal - Page 3 at B5 (in SW corner of South alcove)
5. Tillothy's Journal - Page 6 on the railing at E4 (on East side near bounty Smattin) - the page is about not being able to find any records of the structures in Gortrin; triggers another dialogue option from Raza about the architect.
6. Tillothy's Journal - Page 7 on the floor at D3 (just to the East of bounty Bord)
7. Tillothy's Journal - Page 11 at the north side of C4 (behind bounty Slashick) - the page is about disappearing builders and Gerard; triggers 'Discarded Letter' to appear.
8. Tillothy's Journal - Page 17 on floor in B3 (NE of bounty Rachina)
9. Tillothy's Journal - Page 19 C6 on the floor (just North of bounty Tortrin)
10. Tillothy's Journal - Page 22 B5 floor to the north - after picking this up, the 'Old Journal' may appear (check that it doesn't appear earlier)
11. Tillothy's Journal - Page 23 floor D4 (east of bounty Slickbit)
12. Old Love Letter (F4, SE side on ground near Yezz, from a 'Discarded Letter')
13. Tillothy's Journal - Page 25 H6 on floor (East of bounty Posendun)
14. Musty Journal (D7, near the mushrooms, from an 'Old Journal' in the hand of a skeleton corpse on the ground)
15. Go to Raza and speak to her about everything. When the conversation ends re-start it and continue this loop until the only option left is "Bye" and no further conversation with her is possible. This triggers the appearance of Woman's Hair Adornment and Scroll of Obliterate.
16. Pick up Woman's Hair Adornment (E6, in a 'Shiny Mud Pile' at the side of the smallest pond). This triggers the appearance of Tiko.
17. Pick up Scroll of Obliterate (F8, in a pile of loose rocks just East of bounty Krinks). This triggers the appearance of Gerald.
If you do not wish to work out yourself what to do next then skip to the Spoiler below and follow the steps for the Outcome you wish to achieve.