m (extra info) Tag: Source edit |
mNo edit summary Tag: Source edit |
||
| (5 intermediate revisions by 2 users not shown) | |||
| Line 13: | Line 13: | ||
*'''[[Drakata]]''': [[Drakata Grunt]] |
*'''[[Drakata]]''': [[Drakata Grunt]] |
||
*'''[[Fungasite]]''': [[Firebug]] |
*'''[[Fungasite]]''': [[Firebug]] |
||
| − | *'''[[Elemental]]''': [[Unstable Magma]], [[Magma Guardian]], [[Tetriad]] |
+ | *'''[[Elemental]]''': [[Unstable Magma]], [[Magma Grunt]], [[Magma Guardian]], [[Tetriad]] |
== Bounties == |
== Bounties == |
||
'''Elder/Boss :''' [[Zell]] |
'''Elder/Boss :''' [[Zell]] |
||
| + | *[[Zell's Heart]] |
||
*'''Lava Pad''' |
*'''Lava Pad''' |
||
**[[Nicodemus]] |
**[[Nicodemus]] |
||
| Line 55: | Line 56: | ||
#* '''Orla's Heart'''➤Enter Zell's Lair. |
#* '''Orla's Heart'''➤Enter Zell's Lair. |
||
#** ➤Defeat Zell |
#** ➤Defeat Zell |
||
| − | |||
| − | |||
#<span style="color:#0000ff">'''The Lava Pads'''</span> |
#<span style="color:#0000ff">'''The Lava Pads'''</span> |
||
#*'''The Mind of Nicodemus''' ➤Find Nicodemus. |
#*'''The Mind of Nicodemus''' ➤Find Nicodemus. |
||
| − | #** |
+ | #**''' ➤Solve Nicodemus' Puzzle'''. (Nicodemus has devised a nefarious puzzle that blocks the way! I'll need to solve it to reach. If I fail, then surely death awaits! at bronze, pull every lever once - higher levels/groups = changes each run. [[File:nicodemus puzzle.png|500px]] |
#* '''Nicodemus'''➤Activate the Transporter. |
#* '''Nicodemus'''➤Activate the Transporter. |
||
| − | #** |
+ | #**''' ➤Defeat Nicodemus''' (at level silver: a few molten totems appear - kill asap) |
#** ➤Activate the Scrying Eye (remember the 4 icons that show up - different on every run) [[File:SCREAMING EYE.png|400px]] |
#** ➤Activate the Scrying Eye (remember the 4 icons that show up - different on every run) [[File:SCREAMING EYE.png|400px]] |
||
#** ➤Return to the Furnace |
#** ➤Return to the Furnace |
||
#* '''The Generator'''➤Enter the Correct Sequence. |
#* '''The Generator'''➤Enter the Correct Sequence. |
||
#* '''Orla's Game'''➤Pull Orla's Lever. |
#* '''Orla's Game'''➤Pull Orla's Lever. |
||
| − | #** |
+ | #** ➤Memorize Orla's Pattern. (watch the little flames (bronze:4, silver:4, gold:6, platinum:8) [[File:ORLA's game.png|400px]] |
#* '''Lava Dome'''➤Enter the Lava Domer. |
#* '''Lava Dome'''➤Enter the Lava Domer. |
||
#** ➤Defeat the Tetriad 4 |
#** ➤Defeat the Tetriad 4 |
||
| − | #* '''Choose Nur or Yidoni''' ( |
+ | #* '''Choose Nur or Yidoni''' (appears at level silver) |
#** ➤Defeat either Yidoni either Nur |
#** ➤Defeat either Yidoni either Nur |
||
#* '''Orla's Heart'''➤Enter Zell's Lair. |
#* '''Orla's Heart'''➤Enter Zell's Lair. |
||
| − | #** ➤Defeat Zell |
+ | #** ➤Defeat Zell (at level silver: Zell's Heart appear) |
== Extra Info== |
== Extra Info== |
||
*The higher Raid Level one has: |
*The higher Raid Level one has: |
||
| − | **More bounties will need to be killed - or - |
+ | **More bounties will need to be killed - or - |
**More missions to end before one can move on. |
**More missions to end before one can move on. |
||
| + | *If you have the buff: Overheat: The heat is too much! You will take a percentage of your health as damage every 10". This effect will never take you below 10 health. You can get rid of it by killing the Magma Grunts or Magma Guardian. |
||
| − | |||
[[Category: Raid Zones]] |
[[Category: Raid Zones]] |
||
Revision as of 08:01, 28 August 2021
| Article incomplete. This article is a stub. You can help Villagers and Heroes Wiki by expanding it. |
| Article needs quality control. This article may contain outdated information, have poor formatting and structure, or otherwise be in need of an overhaul. You can help out by editing it to correct any inaccuracies and improve the content. |
Article needs quality control.
This article may contain outdated information, have poor formatting and structure, or otherwise be in need of an overhaul. You can help out by editing it to correct any inaccuracies and improve the content.
This article may contain outdated information, have poor formatting and structure, or otherwise be in need of an overhaul. You can help out by editing it to correct any inaccuracies and improve the content.
| Orla's Veldt | |
|---|---|
| |
| Details | |
| Type | Dungeon |
| Level Range | Scaled |
Orla’s Veldt is the 6th of 7 raid locations. It is added in "The Fiery Veldt" update at June 29th, 2021.
Gameplay
Enemies
- Drakata: Drakata Grunt
- Fungasite: Firebug
- Elemental: Unstable Magma, Magma Grunt, Magma Guardian, Tetriad
Bounties
Elder/Boss : Zell
- Zell's Heart
- Lava Pad
- Magma Mines
- Yidoni
- Nur
Walkthrough
Upon switching the lever, you will start the raid and the timer starts.
- The Furnace ➤Enter the Furnace
- ➤Investigate the Generator
- ➤Click the Generator Sign
- ➤Defeat Magma Guardian (appears at level silver)
- Furnace Choice ➤You will have two options, either The Magma Mines or The Lava Pads.
- The Magma Mines
- The Magma Mines ➤Enter the Magma Mines.
- ➤Find a way in Mushi's Lair.
- ➤Read Unstable Magma Instructions.
- ➤Clear the Path of Destructible Rocks.
- The Lair of Mushi ➤Enter Mushi’s Lair.
- ➤Defeat Mushi
- ➤Enter the Secret Chamber
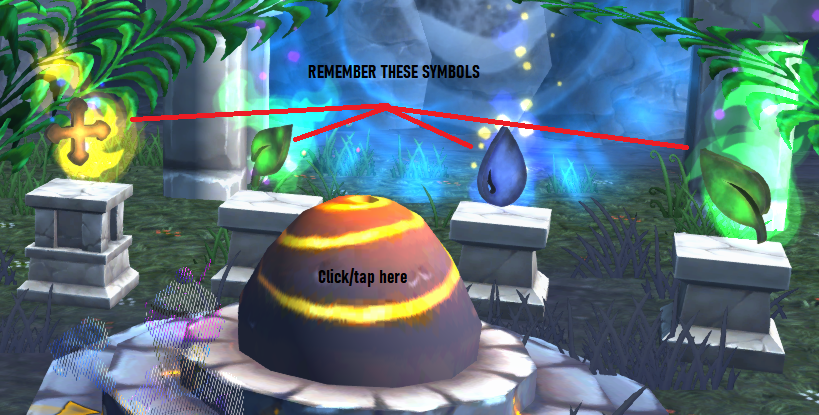
- ➤Activate the Scrying Eye
- ➤Return to the Furnace
- The Generator➤Enter the Correct Sequence.
- Orla's Game➤Pull Orla's Lever.
- ➤Memorise Orla's Pattern. (watch the little flames (bronze:4, silver:6, gold:8, platinum:10)
- Choose Nur or Yidoni (shows up at level silver)
- ➤Defeat either Yidoni either Nur
- Orla's Heart➤Enter Zell's Lair.
- ➤Defeat Zell
- The Lava Pads
- The Mind of Nicodemus ➤Find Nicodemus.
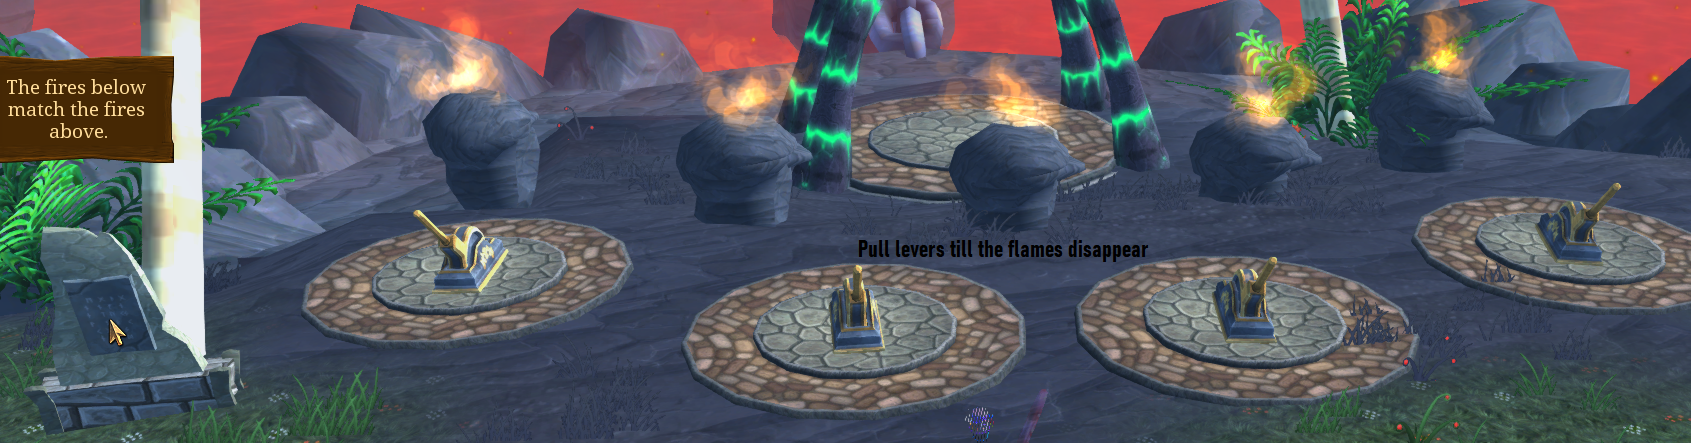
- ➤Solve Nicodemus' Puzzle. (Nicodemus has devised a nefarious puzzle that blocks the way! I'll need to solve it to reach. If I fail, then surely death awaits! at bronze, pull every lever once - higher levels/groups = changes each run.

- ➤Solve Nicodemus' Puzzle. (Nicodemus has devised a nefarious puzzle that blocks the way! I'll need to solve it to reach. If I fail, then surely death awaits! at bronze, pull every lever once - higher levels/groups = changes each run.
- Nicodemus➤Activate the Transporter.
- ➤Defeat Nicodemus (at level silver: a few molten totems appear - kill asap)
- ➤Activate the Scrying Eye (remember the 4 icons that show up - different on every run)
- ➤Return to the Furnace
- The Generator➤Enter the Correct Sequence.
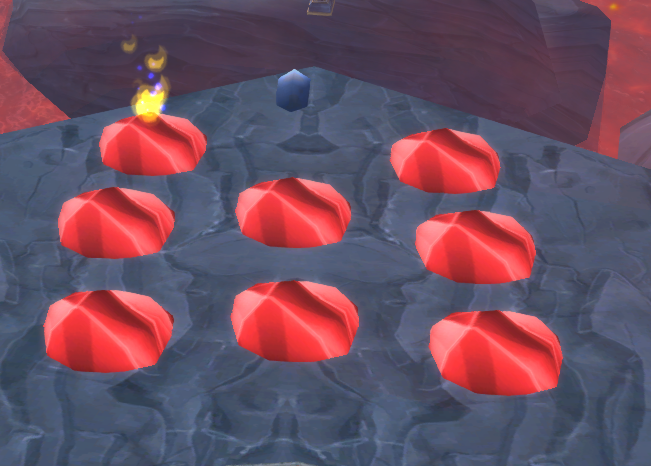
- Orla's Game➤Pull Orla's Lever.
- ➤Memorize Orla's Pattern. (watch the little flames (bronze:4, silver:4, gold:6, platinum:8)
- ➤Memorize Orla's Pattern. (watch the little flames (bronze:4, silver:4, gold:6, platinum:8)
- Lava Dome➤Enter the Lava Domer.
- ➤Defeat the Tetriad 4
- Choose Nur or Yidoni (appears at level silver)
- ➤Defeat either Yidoni either Nur
- Orla's Heart➤Enter Zell's Lair.
- ➤Defeat Zell (at level silver: Zell's Heart appear)
- The Mind of Nicodemus ➤Find Nicodemus.
Extra Info
- The higher Raid Level one has:
- More bounties will need to be killed - or -
- More missions to end before one can move on.
- If you have the buff: Overheat: The heat is too much! You will take a percentage of your health as damage every 10". This effect will never take you below 10 health. You can get rid of it by killing the Magma Grunts or Magma Guardian.